Hello, here I will show how to make a headband with bow for a doll. This item can be resized to fit all sorts of different dolls. For younger crafters adult supervision is recommended when working with sharp items and adhesive glue.
I have opened an Etsy shop called Ruffled Crenellations!
If interested in making the full outfit, the pattern is for sale at:
Materials:
- fabric (quilting fabric is recommended)
- fabric glue
- a thin stick or skewer to spread glue on fabric
- a bottlecap or other circular shaping template
- a ruler
- scissors
- a drawing tool
- a thick-coated wire paperclip
- wire cutters
- pliers
- a needle and thread
- lace (optional)
I will be making a headband to fit a Takara Jenny friend-sized head. The measurements used in example photos will produce a headband tailored to best fit that specific size.
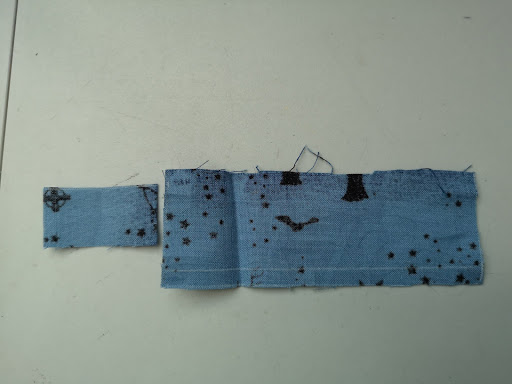
Cut a piece of fabric that is 11cms in length
and 4cms in width.
Then cut a smaller piece 4cms in length
and 2cms in width.
Turn the two pieces over to their back sides,
fold the edges on their longer sides, glue the edges down and allow the glue to dry.
Turn them back over to their good side and cover the long edges with lace (optional).
Allow the glue to dry.
This photo of the back provides a better view of the difference in overlap that was used to create a differentiating effect between the two pieces using the same materials.
On the back of the larger piece find the centre.
Fold and crease the fabric to mark the centre.
Then spread glue along the centre line.
Fold the raw edges over and press the edges into the glue along the centre line to affix them in place.
Allow the glue to dry.
Put both fabric pieces aside to prepare your next component.
Next, measure the top of the doll's head from ear to ear. The doll I'm using measures 7.5cms across.
Unfold a paperclip and cut it to the measured length with wire cutters.
CAUTION: the clipped piece may shoot across the room or up into one's face if not cut in a careful manner.
Use pliers and a little help from a bottle cap to shape the paperclip into an arch shape.
Note: shape it a little bit wider than the dolls head.
Cut a long piece of fabric that is slightly longer than the wire measurements.
The piece I cut measures 9cms in length
and 2cms in width. Fold this piece of fabric to mark the centre.
On the back side of the fabric spread glue on bottom edge. Place the wire end in the middle of the fabric just above the glue, then fold the edge up. Repeat this process for the other side. Add some glue in the middle of the centre line to hold the wire in place.
Allow the glue to dry.
On one side, cut some darts.
Note: be sure not to cut them too close to the wire.
Fold the darted side in and glue it into place.
Fold the other side in and glue it into place.
Allow the glue to dry.
Now all three components are ready to be assembled into a headband.
With a needle and thread gather the centre of the largest piece to give it a bow shape.
Then attach the bow to the headband by wrapping the thread around the centre of the headband and the bow. Tie and cut off any excess thread.
Glue one raw edge of the smaller piece of fabric to the underside of the headband and allow the glue to dry. Affixing one side at a time requires more patience but allows the bond to hold under tension. Repeat the process with the other side.
Allow the glue to dry and it's all done!


No comments:
Post a Comment